Tally 9 was initially released to the public in 2006. Since then, it has become an irreplaceable tool in business! Tally Prime, Tally’s latest business managing accounting tool, has superseded Tally ERP 9. That’s why many businesses are moving their work to Tally Prime from Tally ERP 9. This process is not complicated at all. This post will teach you how to convert from Tally ERP 9 to Tally Prime. So, let’s go through the method first and then do it step by step.
Did you know? You can rewrite any company data by pressing Ctrl+Alt+R. It makes the data compatible with Tally ERP 9!
Migrating from Tally ERP 9 to Tally Prime:
- Download Tally Prime Setup to get started. Execute the file when it has been downloaded, which is a simple but important step in the process. Now the setup administrator will begin to run.
- There are two choices on the screen of individuals who have Tally ERP 9. You have the option of modifying an existing file or creating a new one.
- You must maintain the existing Tally installation and build a new one throughout this process.
- Tally Software Services (TSS) must upgrade from Tally 9 to Tally Prime. You can also renew your TSS if it has expired.
- If you’re having trouble with a large number of installations or they don’t appear in the list, you may either ignore it completely or manually choose them.
- The following step is to choose a location, after which you should click ‘Install’ to complete the installation.
- Users who choose the upgrade option must now click Update to update Tally ERP 9 to Tally Prime.
- Here you’ll also find advanced options like Configure and More Actions. You can disregard these extra buttons for advanced options.
- When you’ve finished the previous step, the installation will begin. In a window on your screen, the words ‘Installation Successful’ will display.
Start-up screen in tally prime:
Tally Prime is now being successfully installed. The Basic Startup Screen displays certain options as it loads. You must select one of them based on your requirements.
These alternatives are as follows:
- Continue to use the educational mode: If you want to try out the features before buying a licence, choose this option. This option is also available to Tally Remote Users who can view data.
- Network License to Use: Choose this option if you have a multi-user licence. A network licence is required to use this.
- Reactivate an existing licence Those who are activating an existing single-user licence or installing it on their Tally Server machine to utilise Tally clients over a LAN should pick this option.
- Activation of a New License: You’ll need to choose this option if you’re starting a new licence. Following that, select: Renew Existing License.
You may simply transition from Tally ERP 9 to Tally Prime by executing these procedures.
Also read: What is Bank Reconciliation in Tally.ERP9
Tally Data Backup
Migration is the process of changing data to meet the new version. It’s a vital stage in the software upgrade process. Data might become useless as a result of failed data transfer. It’s possible that this is due to data that hasn’t been properly changed. As a result, it is highly recommended to make a backup of important data before updating.
How to take backup in tally prime?
The backup process in steps are:
- Select ‘Backup’ from the drop-down menu under ‘Select Company.’
- Select a firm from the List of Companies.
- Press the ‘Enter’ key.
- The backup process will begin.
- It will be finished in a few minutes.
Data Migration from Tally ERP 9 to Tally Prime:
We are now ready to begin the data migration after a successful data backup. To do so, launch Tally ERP 9 then enter the location where the data is stored.

Now launch Tally Prime and paste or navigate the same url. It will display a list of all firms in the same way as Tally ERP 9 does. The only difference is that every firm has a “Migration Required” statement next to their company number.
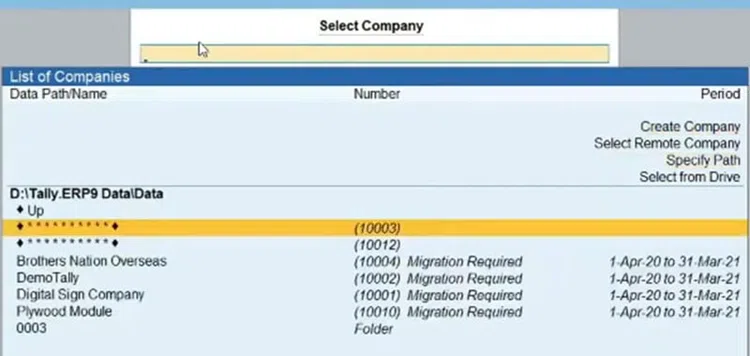
This implies that you’ll need to migrate your data from the previous edition to Tally Prime to open that firm. Simply choose the firm and press enter to migrate.
It’s worth noting that a business may only be utilised in one version at a time. As a result, only one version of business data will be available. It is not possible to use the same business in several versions simultaneously.
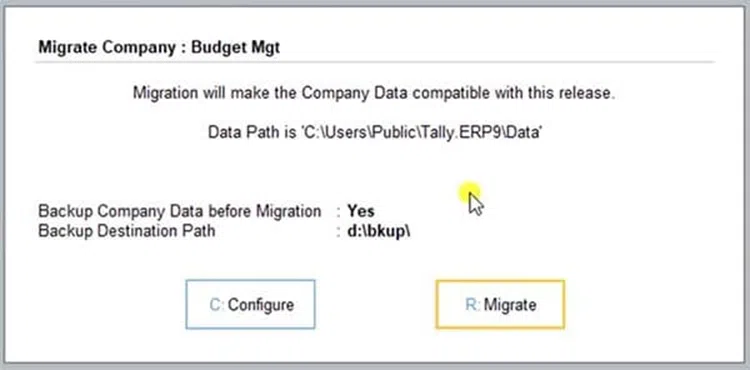
The backup will then be requested, along with its route, on display above. If you haven’t done so before, go to C: Configure to take a backup and alter the backup path.
By default, the data backup function is set to YES. You can choose to update it if you want to. Select R: Move to commence the migration process once you’ve taken a backup.
After you’ve completed this, your firm will appear on the list of organisations, and you’ll be good to go because your organisation is now Tally Prime compliant. It indicates that Tally ERP 9 is no longer associated with it.
Also read: Know About Receipts and Payments Report in Tally
How to Rewrite Tally Data – Tally Prime to Tally ERP 9?
In certain circumstances, you may need to roll back data or transfer data from a higher version to an earlier version, from Tally Prime to Tally ERP 9.
As a result, if you try to use Tally Prime corporate data in Tally ERP 9, you’ll see this error notice.
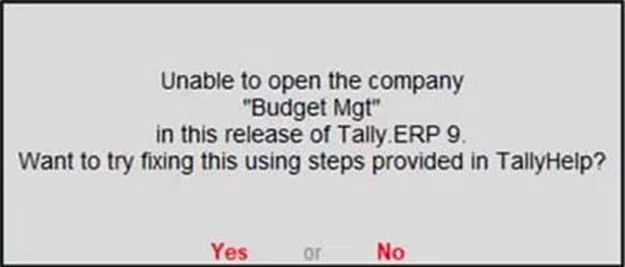
But don’t be concerned. If you wish to keep using the same business in Tally ERP 9, you must use the Rewrite Operation. By hitting Ctrl + Alt + R, you can easily modify any business data to make it compliant with Tally ERP 9.
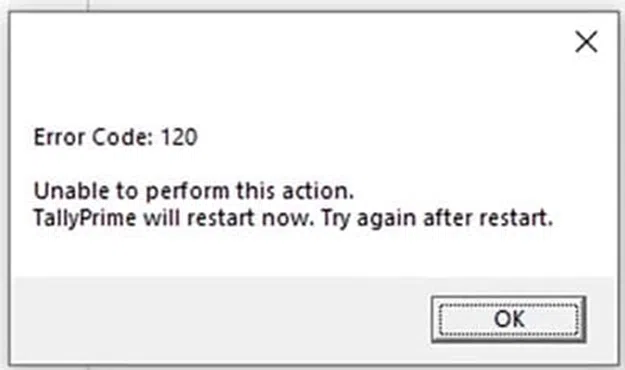
After a few seconds, your upper version files should now be interoperable with the lower version files. Upon rewriting, you may encounter an error while choosing the company.

You can change the Unit Quantity Code (UQC) immediately by pressing Enter or later by pressing the ESC key. Your business is now up and running.
Note: If you rebuild a business, it will no longer be functional with Tally Prime, resulting in this error.
To resolve this, you can transfer Tally ERP 9 data to Tally Prime using the same procedure described above.
Also read: What is Bills Receivable Report in Tally?
Conclusion:
When you wish to use data from multiple versions, you must first migrate or rewrite it. It makes the required data modifications to ensure compatibility with the target version. We hope this article clarifies how to convert tally prime data to tally ERP 9, along with the steps for creating a tally backup and rewriting tally data.