Tally is a widely used accounting software. Most accounts-related tasks require a basic knowledge of Tally ERP. Tally offers various features and functions, starting from data entry to advanced-level features such as outstanding management, audit features, payroll, taxation, billing, inventory management etc. Tally online software enables you to fulfil organizational accounting requirements at an affordable price. Therefore, it is necessary to know how to access Tally from remote locations by understanding how to use Tally online. In this article, we will focus on how you can use an online Tally software.
Did you know? Tally is also known as multilingual software as Tally ERP 9 accommodates multiple languages.

Also read: Accounting Vouchers in Tally – Here’s An Overview on Accounting Vouchers in Tally ERP 9
What is Tally Online?
The online Tally software manages everything from primary data entry to high-end features including management, taxation, audit features and much more. Thus, it is necessary to keep all these features in sync to access them from multiple locations. Some features of Tally online are:
- You can login to Tally ERP 9 online from any PC or device and can access it from any Operating System.
- Online Tally ERP 9 allows you to use your Tally License to host your Tally ERP on the Tally cloud servers.
- The Tally online software is accessible to any organisation.
- Small businesses don’t need to worry about server maintenance.
- Multi-branch businesses can use the centralized Tally on web software to access the system from any location and boost productivity and efficiency.
Difference Between Traditional Tally and Online Tally Software
To differentiate between online Tally software and traditional Tally, we need to understand the features of both the softwares.
|
Metric of Difference |
Traditional Tally |
Online Tally |
|
Device |
You need to install it on every device or on a secured LAN network. |
All users can access online Tally from any device without having to install it on every device. |
|
Backup |
It needs manual backup. |
Backups are automatically performed online. |
|
Location |
You can use it only from a location where the software has been installed on your PC. |
You can use it anywhere, anytime, and on any device |
|
Data Sync |
Your data can not be synced in real-time. |
The data is synced in real-time. |
|
Support |
The Tally software needs to be secured with the help of an IT professional. |
No IT professional is needed to secure your Tally software as the data is secured online. |
|
Security |
You need additional software and an IT professional to take care of the security of your Tally data. |
All your Tally data is protected against malware, viruses and ransomware with the help of inbuilt data security in Tally on Cloud. |
The Tally Online Features
-
Multi-layer Security
Online Tally takes care of security, your seamless business continuity, and provides you with multi-tier security infrastructure and ISO (International Organisation for Standardisation) and IEC (International Electrochemical Commission) certified anti-DoS approach.
-
Auto-sync
Tally online software provides you with real-time data synchronisation and accounts operations from multiple branches which ensure you can update your centralized data automatically from remote locations.
-
Auto Backup
Tally online software facilitates off-site and on-site automatic backing up of your important Tally data in the Tally cloud. This reduces the need of manual backups.
-
Customisation
Online Tally provides customisation support to all kinds of businesses based on their requirements, irrespective of their size.
-
Access Privilege
Tally ERP 9 online or any other version of this accounting software can easily be installed with security and be accessed from any device for business operations.
-
Data Encryption
All your data stored in Tally on the web is highly secured in the Tally cloud server since only approved users are permitted to access the centralised Tally account.
-
Higher Uptime
Tally online ensures that all business infrastructure requirements except for the scheduled maintenance can be accessed most of the time in a particular assigned month.
-
Cost-saving
Tally cloud does not need any server maintenance including the network, and provides multiuser access within bandwidth, making it an economical and ideal investment.
How to Operate Tally Online?
If you want to allow remote access to your business entity, you will need to manually enable the Tally online feature. You need to access Tally.NET IDs to access your business account remotely. Your company needs to be connected to Tally.NET services to allow its users remote log-ins.
Connect Your Company to Tally.NET
You can decide when you would want to connect your company to Tally.NET for remote access of users. You need an internet connection where Tally.ERP 9 is installed on the computers.
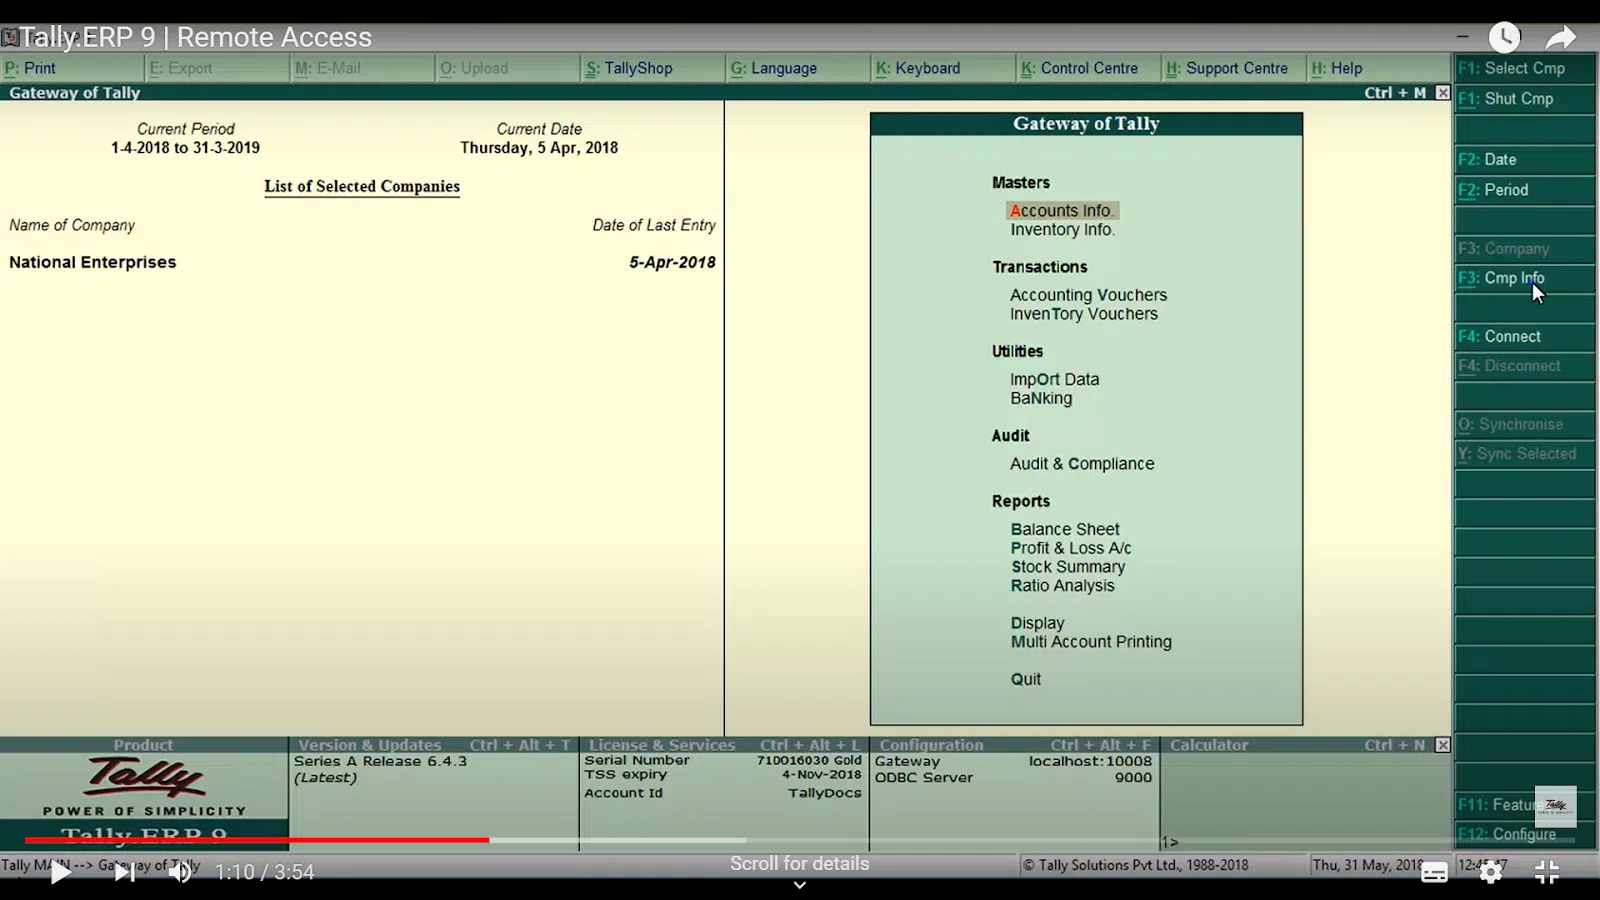
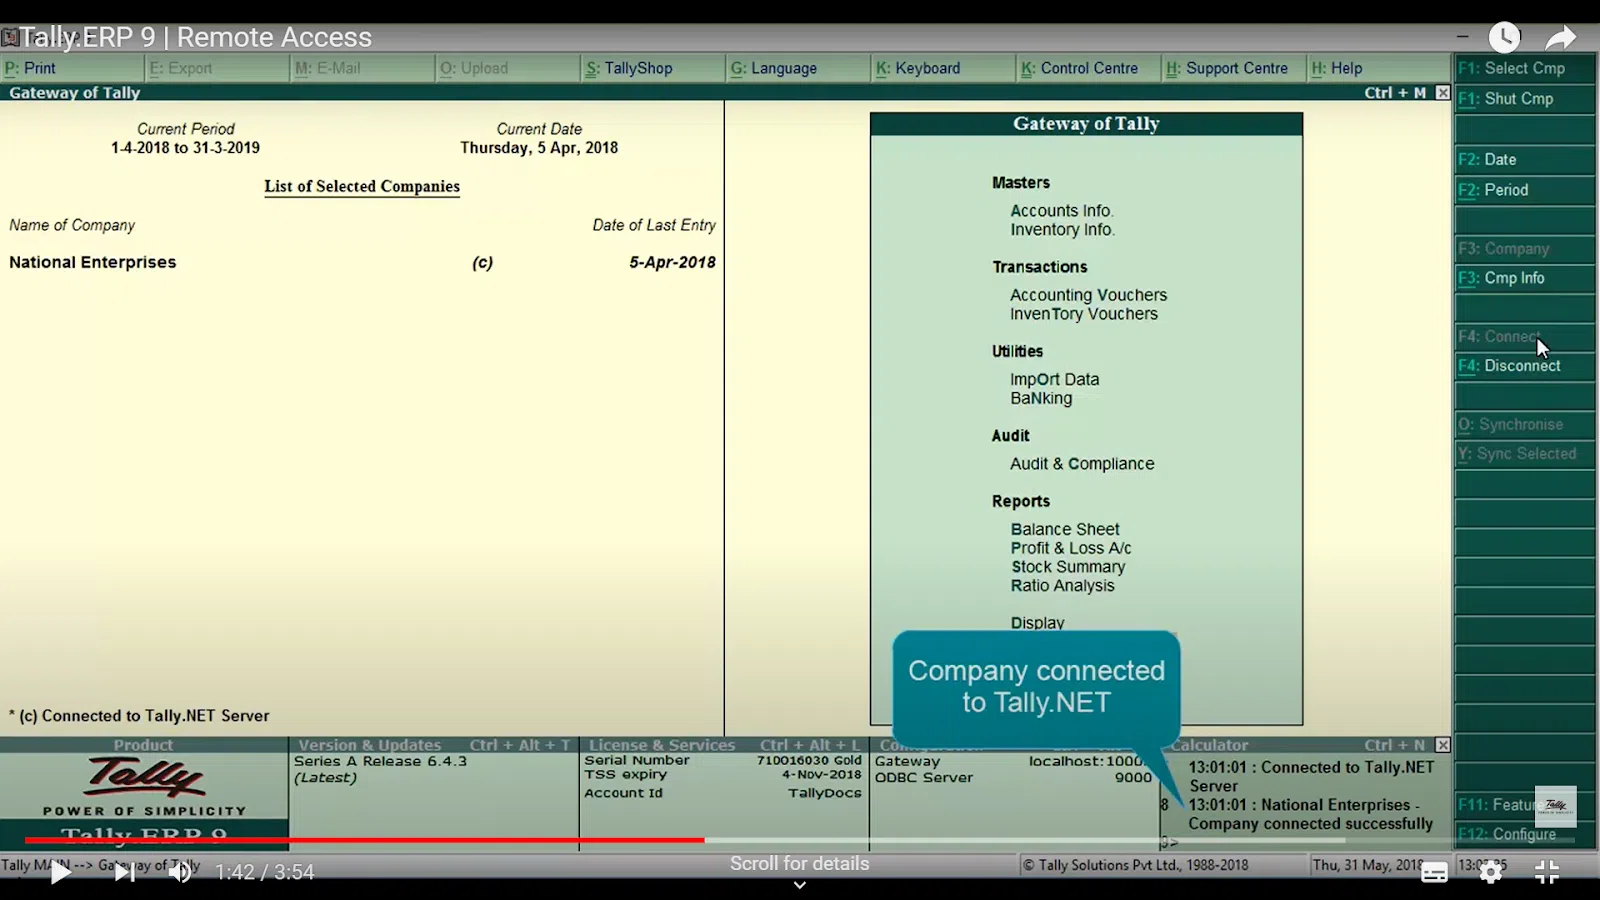
1. Go to Gateway of Tally and Click F4: Connect
In case, you have not had security control enabled for your business, you will need the same for access to Tally.ERP 9. To enable security control, you will need to follow these steps:
- Go to Security Control > Use Security Control > Yes
Also read: How to do Payroll Management in Tally ERP 9
- Provide the administrator details.
-
Enable Report Access to the Users of Tally.NET.
- Add a user and connect > Yes
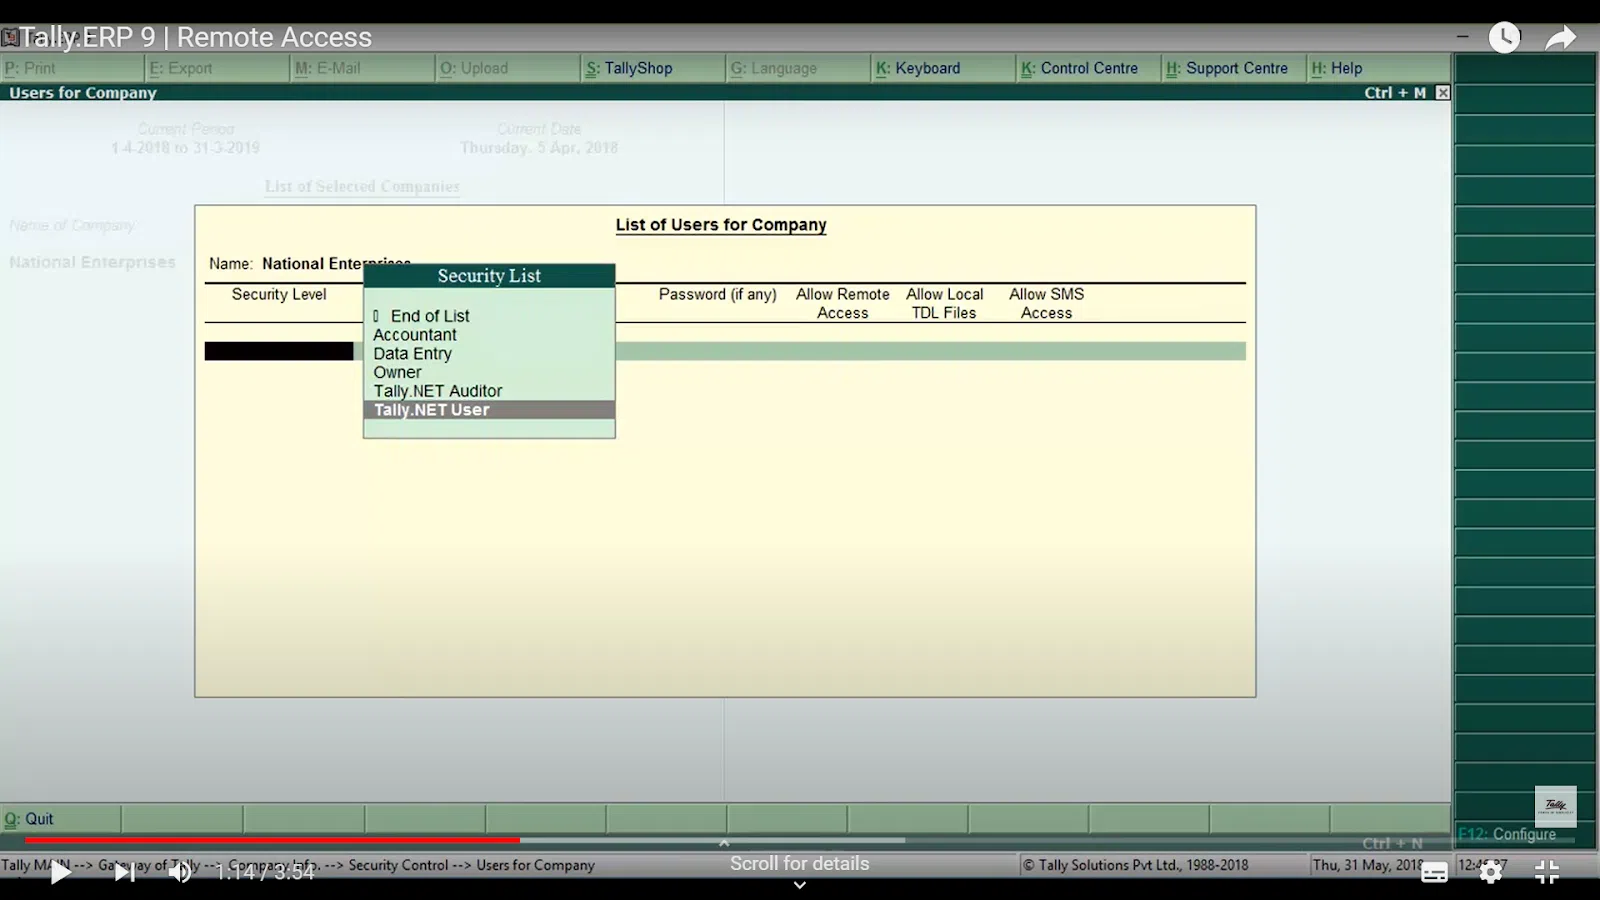
- Select the Security Level to Tally.NET Owner.
- Enter an identifiable Tally.NET ID for the Username/Tally.NET ID to give access to the particular Tally account.
- Once your company is connected, a © sign appears against your enterprise name in the Gateway of Tally List of Selected Companies.
3. Log in to Tally.ERP 9 from Remote Location
For Tally.ERP 9 login from any location, you need to provide your Tally.NET ID and password.
- Go to Company Info > Login as Remote User, in case you are using a licensed Tally.ERP 9 version from a remote area.

- Go to Tally.ERP 9 > Startup screen> select Login as Remote Tally.NET User, in case you are using the Educational Mode from a remote location.
- Enter the Tally.NET ID and your password.
- Select the remote company and perform authentication. The remote user details are then displayed on the Gateway of Tally screen. The Licence section of the information panel will display the Remote Serial Number.
Depending on the allowed access, the selected company will be available for use. Once you create a remote session in the Tally.NET server, a unique ID number will be generated and the session will remain valid until the user logs out. Only one company data can be accessed at a time by a remote user.
4. Manage Access Rights of Users
More than one Tally.NET user can access Tally.ERP 9 remotely. Certain features can be made available for certain users.
Create Tally.NET IDs – You can create direct Tally IDS on the portal. Create them using the Control Centre in Tally.ERP 9. After creation, you will need to allow remote access to the portal for log in. To allow many users to access Tally online, follow these steps:
- Go to Gateway of Tally > F3: Cmp Info > Security Control > Users and Passwords
- Security level > Tally.NET Owner, Tally.NET User, or Tally.NET Auditor. You can also create customised security levels.
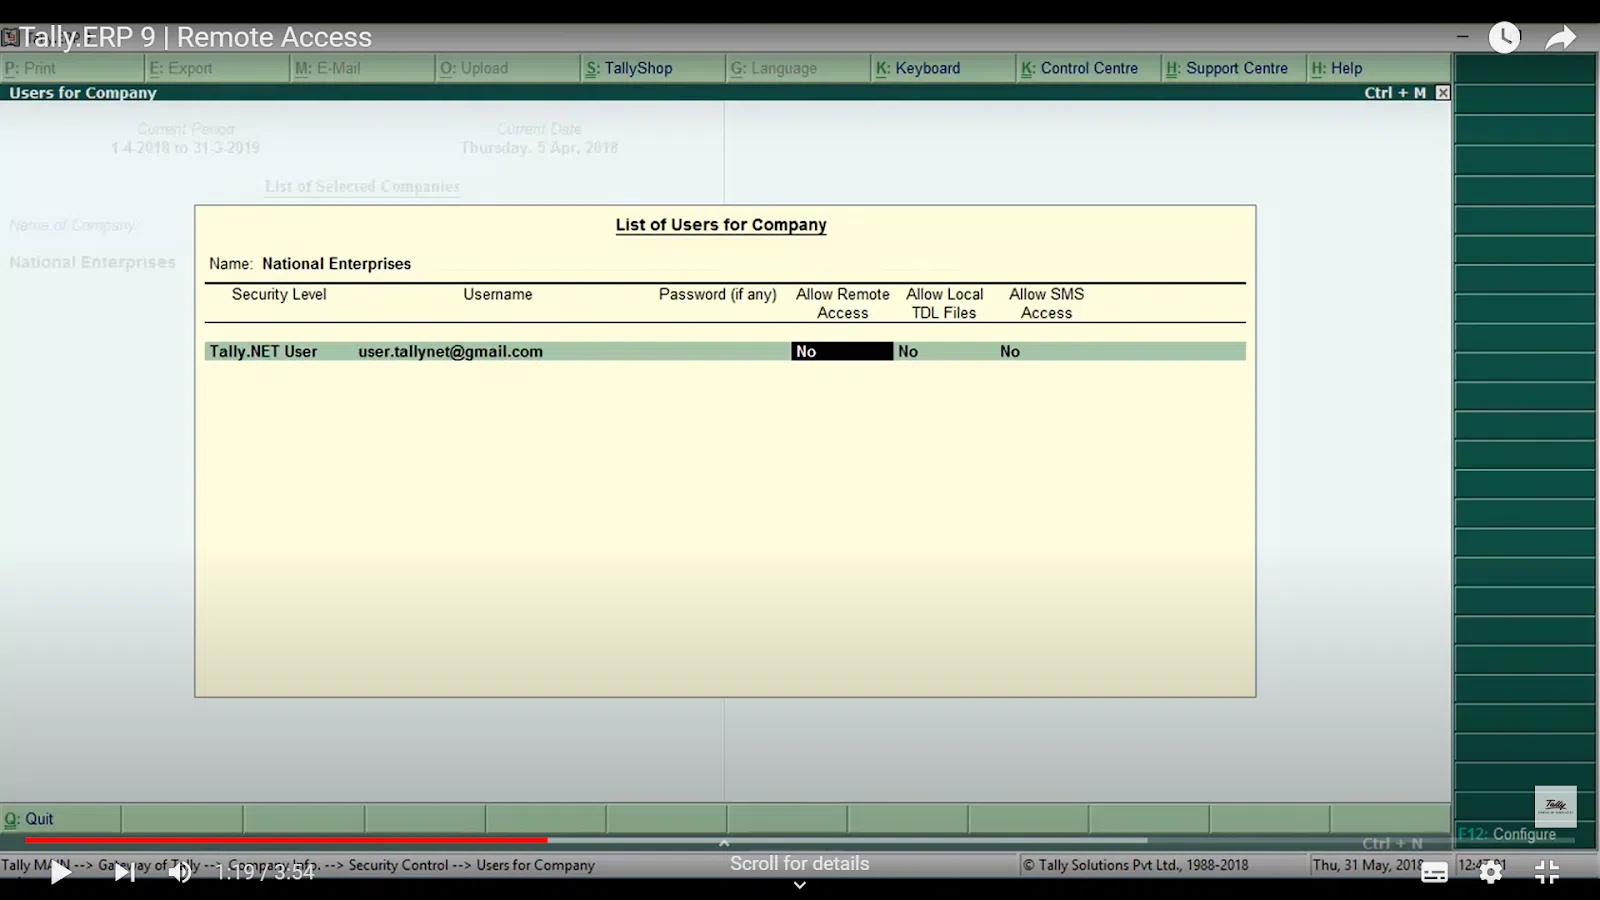
- Username/Tally.NET ID > enter Tally.NET ID.
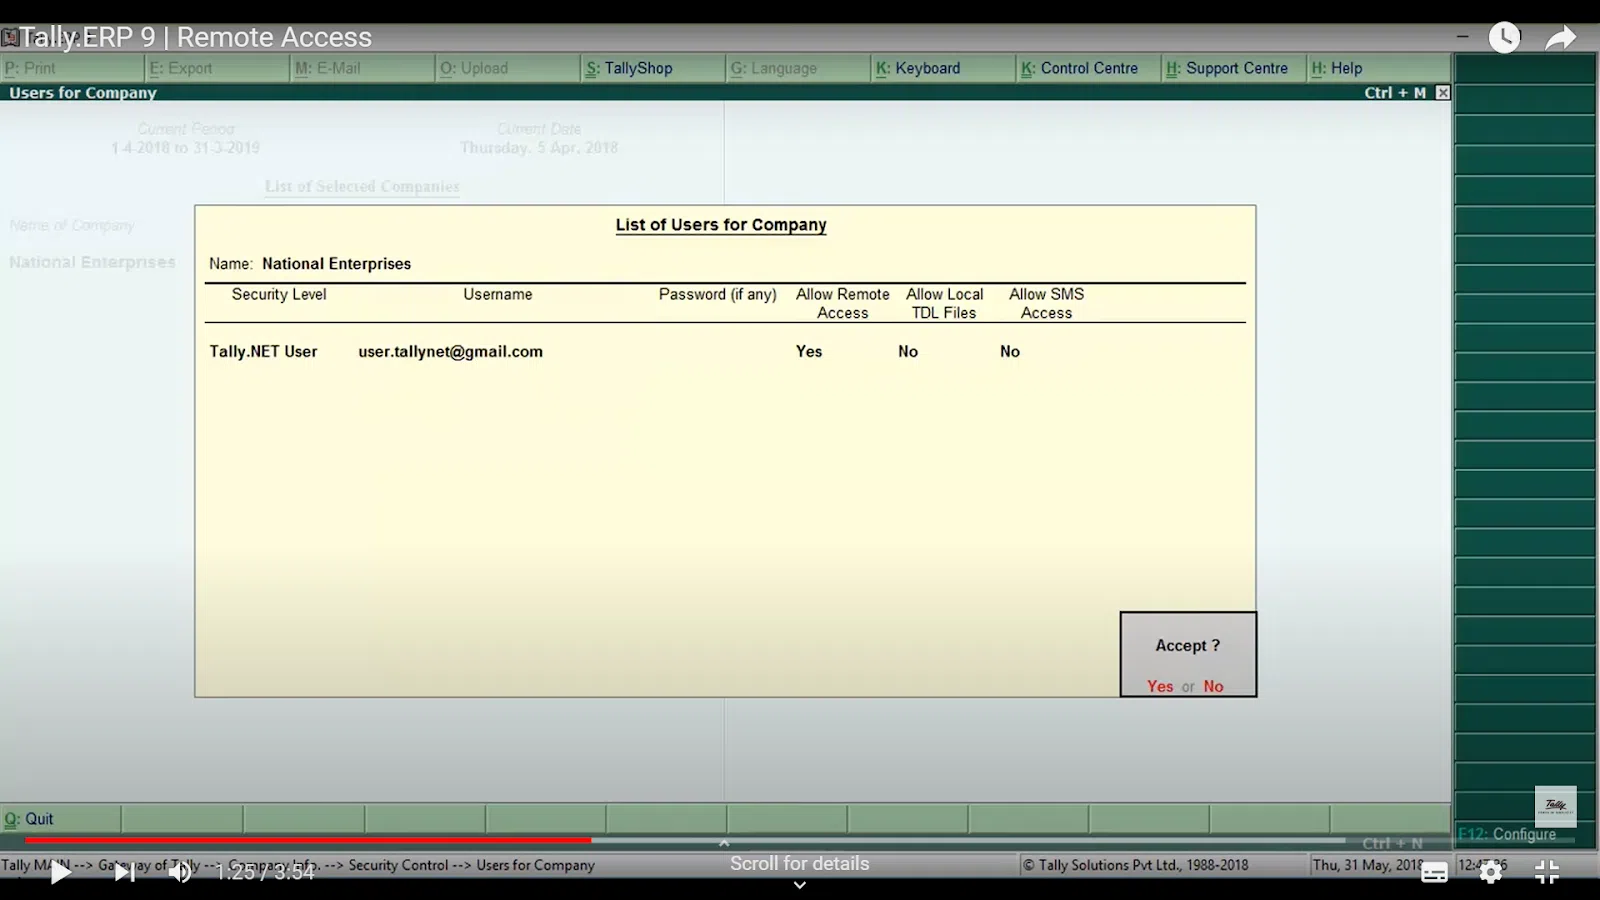
- Allow Remote Access > Yes > Accept
- Allow Local TDL > Yes
5. Create Security Levels
You can customise different features in Tally ERP 9 and make them available to selected users through multiple security levels. You need to add Tally.NET IDs under these security levels to control who can access which feature online.
6. Manage Company for Remote Access
After you complete the steps mentioned above, you will need to have complete flexibility and control of the setting for remote access.
- Enable/Disable Remote Access:
- To enable it go to F11:Features > F4: TSS Features and check settings. Once enabled, you will see Connect to Tally.NET Services is set to Yes.
- To disable remote access, make the Tally.NET Services option No.
- Disconnect Company:
To disconnect your company-
- Click F4: Disconnect and the status of the company will change to offline on the Tally portal.
- Connect/Disconnect Multiple Companies:
To connect multiple companies:
- Open all required companies.
- Click F4: Connect
- Connect Companies screen > Select required companies
- Press Enter to connect.
To disconnect multiple companies:
- Press Alt + F4
- Disconnect Companies screen > Select companies to be disconnected and accept.
- Connectivity Status Report:
To get the browser access details of connected companies, this report is necessary. To get this report:
- Go to Gateway of Tally > F3: Cmp Info
- Select Connectivity Status
Also read: Journal Voucher in Tally – Examples, & How to Enter Journal Vouchers in Tally
Conclusion:
Tally could be used virtually with the help of cloud technology, giving you the convenience and portability of using tally from anywhere at any time from a computer or any device having any OS. Hopefully, this article gave you a clear idea about how to work on the Tally. You can access Tally for free or go for an online Tally purchase to access premium features.