Tally ERP 9 (ERP stands for Enterprise Resource Planning) is India’s most widely used accounting program. It is a complete enterprise software for small and medium-sized businesses. It is an outstanding business management system and GST software that combines control, function, and built-in customizability.
Tally. ERP 9 is a product that offers complete business functionalities such as Finance, Accounting, Inventory, Point of Sales, Sales & Purchase, Manufacturing, Payroll, Costing, and Branch Management, as well as compliance capabilities for TDS, TCS, Excise and also GST.
Sales Return or Credit Note
A Return Inward Journal, also known as a sales returns journal or a sales credit daybook, is a primary entry book or a daybook used to record sales returns. In other words, it is the record of the products that are returned by the receiver. The Credit note is the primary document used as evidence when recording transactions in the sales returns ledger.
After selling the products, if the customer returns all or some of the goods, the sales return needs to be accounted for. When the returned goods are accepted, this transaction can be recorded using Tally’s credit note feature, either before or after receiving payment for them.
Reasons for Sales Return
Merchandise/goods are returned by the buyer to the seller, usually for one of the following reasons:
- Defective/Damaged Product
- Late shipment of goods/products
- Wrong products shipped
- Outdated/expired products
- Delays in receipts
- Excess quantity ordered/shipped
- Incorrect product specification
Type of Sales Return
After accepting the sale returns, they are recorded as credit notes. A credit note is a document sent to the buyer that states you are crediting their accounts in their books of accounts for the specified reason
The sales return can either be recorded:
- Before receiving the payment
or
- After receiving the payment
Let’s understand the process to record both scenarios in Tally.ERP 9
Also Read: How to Use GST in Tally ERP 9?
Sales return before payment has been received
If sales returns are being recorded before receiving payment, Agst Ref can be used as a reference to attach the credit note entry in Tally to the sales invoice.
Step 1: From the gateway of Tally, enable the credit note in Tally feature:
a. Press F11(shortcut for Features), followed by F1 for Accounts.
b. Set the option “Use debit and credit notes” to Yes, to use the voucher mode to record the transaction.
For recording the option in the invoice mode, set the option “Record credit notes in invoice mode” to Yes.
Step 2: Open the credit note voucher screen.
- From the Gateway of Tally, go to the “Accounting Vouchers” screen
- Press Ctrl F8 or click on Credit Note.
Press Alt I and select the invoice mode as per your business needs.
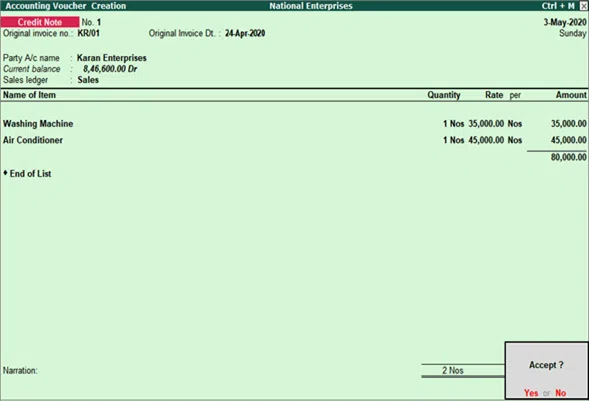
Step 3: Specify the buyer details.
a. “Original invoice Dt” and “Original Invoice No.”: Give the details of the original Invoice number against which the goods are being returned and also fill in the date of the original invoice or sales
b. Party A/c Name: Select the party name.
c. Party Details: Add the details of the buyer. Receipt of the order details can be added as per the invoice requirements.
If the “Party Details” screen is not visible, press F12 (shortcut for Configure) and set “Enable supplementary details” to Yes.
To save, press Ctrl A and proceed further.
Step 4: Allocate the stock items by selecting the sales ledger
Step 5: Provide the returned product details, the number of units returned in the Quantity column and the rate at which the quantities were purchased originally in the Rate field.
Create the item on the fly, just as in other transactions, by pressing Alt C.
a. Select the returned item.
b. Enter Quantity(of the returned item).
Based on the rate entered in the last transaction, “Rate” will get auto-filled. However, the Amount also gets auto-filled.
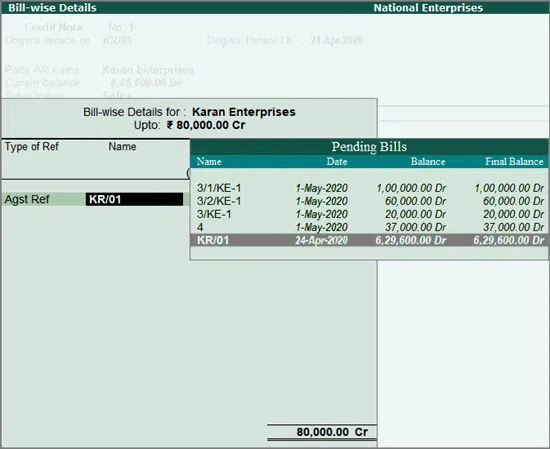
Step 6: Select the bill-wise details.
a. Press F12(shortcut for Configure), then set the value of “Use defaults for bill allocation” to No.
Henceforth, the bill references can be selected in the “Bill-wise Details” screen until the option in the Configure (F12) of the invoice is not changed.
b. Select Agst Ref because the payment for the sales has not yet been received.
Step 7: Give the “narration”, if required.
Depending on your selections, what you see on the screen may change. F12 (Configure) is used to adjust options, and F11 (Features) is used to enable or disable features.
Step 8: To save, press Ctrl A.
The credit note in Tally will be entered into the Credit Note Register.
Also Read: All About Banking Entry in Tally ERP 9
Sales returns after payment were received
If you are documenting sales returns after receiving the amount, you can choose New Ref while recording the credit note. The credit note will be attached to the sales invoice if you supply the reference. As a result, you can charge it to this credit note when you issue a sales invoice later.
Step 1: From the gateway of Tally, enable the credit note in Tally feature.
a. Press F11(shortcut for Features), followed by F1 for Accounts.
b. Set the option “Use debit and credit notes” to Yes, to use the voucher mode to record the transaction.
For recording the option in the invoice mode, set the option “Record credit notes in invoice mode” to Yes.
Step 2: Open the credit note voucher screen.
- From the Gateway of Tally, go to the “Accounting Vouchers” screen
- Press Ctrl F8 or click on Credit Note.
Press Alt I and select the invoice mode as per your business needs.
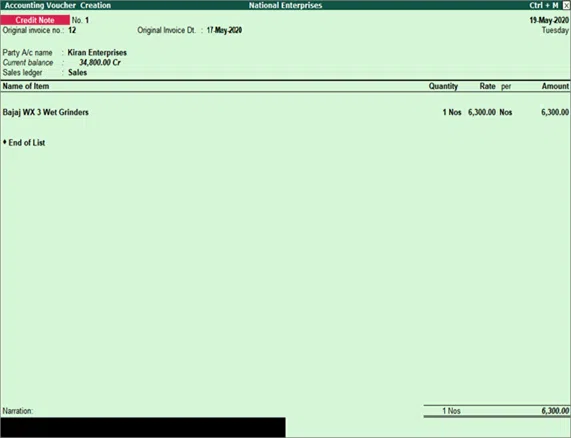
Step 3: Specify the buyer details.
a. “Original invoice Dt” and “Original Invoice No.”: Give the details of the original Invoice number against which the goods are being returned and also fill in the date of the original invoice or sales
b. Party A/c Name: Select the party name.
c. Party Details: Add the details of the buyer. Receipt of the order details can be added as per the invoice requirements.
If the “Party Details” screen is not visible, press F12(shortcut for Configure) and set “Enable supplementary details” to Yes.
To save, press Ctrl A and proceed further.
Step 4: Allocate the stock items by selecting the sales ledger
Step 5: Provide the returned product details, the number of units returned in the Quantity column and the rate at which the quantities were purchased originally in the Rate field.
Create the item on the fly, just as in other transactions, by pressing Alt C.
a. Select the returned item.
b. Enter Quantity (of the returned item).
Based on the rate entered in the last transaction, “Rate” will get auto-filled. However, the Amount also gets auto-filled.
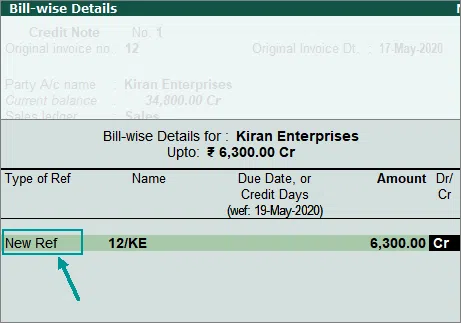
Step 6: Select the bill-wise details.
a. Press F12(shortcut for Configure), then set the value of “Use defaults for bill allocation” to No.
Henceforth, the bill references can be selected in the “Bill-wise Details” screen until the option in the Configure (F12) of the invoice is not changed.
b. Select New Ref, as the payment for sales has already been received.
c. Give the “narration” if required.

Depending on your selections, what you see on the screen may change. F12 (Configure) is used to adjust options, and F11 (Features) is used to enable or disable features.
Step 7: To save, press Ctrl A and accept the “credit note screen”.
The credit note can be settled by sending the buyer a sales invoice or payment voucher.
How to Enter Credit Note in Tally using Credit Note Register
The Credit Note Register allows you to keep track of the sales returns received from your clients. It shows a monthly breakdown of credit notes. This report can be seen in a browser.
1. From Gateway of Tally, go to Display >> “Account Books.”>>“Journal-Register.”>>“Credit Note Register”.
2. Select the month ( for which the report is required) and press Enter.
3. Press F5 (shortcut for Columnar) to view the “credit note columnar view”, set the options as required.

The columnar “Voucher Register” of credit notes will appear as shown:
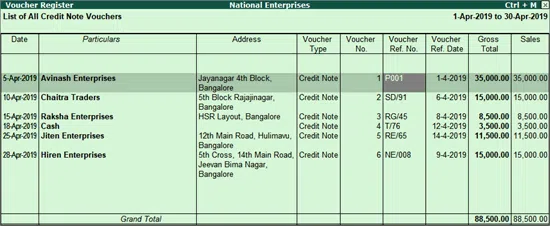
Press F4 (Shortcut for Change Voucher) in “Voucher Register” to change the voucher type.
Conclusion
We hope this article has helped you understand sales return entry in Tally ERP 9 and how to enter sales return in Tally. We have also looked into the different situations you can use it in.