In TallyPrime, a company is similar to a book in which all of a business’s different financial dealings are recorded. In other words, if you want to record transactions in TallyPrime, you must create a company first. This is similar to setting up a book to keep track of your firm’s financial dealings.
After you have successfully installed and activated your TallyPrime license, the first step that you should take is to create a company. This article will guide you in detail about creating a company in TallyPrime.
It’s important to your company’s growth to keep track of your transactions daily with TallyPrime.
Did you Know? With Tally, you can create as many companies as you like. You have two options when choosing a company type. An inventory-based company and one without inventory can be created.
How to Create a Company in TallyPrime?
You can create a company in TallyPrime to keep track of all your business transactions. It enables you to access and alter your transaction entries through the firm and review financial reports based on the transactions you manage.
Organise a Business
To create a company, enter its name, address, and other facts, such as financial year and related information, on the displayed form. Once you’ve set up your firm, you may use the following tools to set your business preferences:
- Accounting
- Inventory
- Payroll
- Taxes
Your transactions can also be accounted for by specifying the tax registration details such as GSTIN or TIN.
All of your company’s commercial transactions are safe and secure with Tally’s security features. Your company’s transaction records can be further protected from unauthorised access by enabling extra security settings.
Also Read: How to view Stock Details for Each Godown in Tally?
Establish a Company to Keep Track of Your Commercial Dealings
To maintain a record of all of your business transactions and examine the associated financial reports, you will need to create a company. While creating a company, you can select a company name and address. You can also update other elements such as the contact information and the financial year to start the firm.
How to Create a Company?
- When you first start up TallyPrime, click the Create Company option.

- You may start a new business by pressing the shortcut key combination Alt + K (Company) > Create. This option applies even if you already have another company open.
- Please include information about the company.
- Fill out the fields for “Name,” “Mailing Name,” and “Address.”
Note:
Your company data will be saved in the Company Data Path folder, which by default is the same folder where TallyPrime was installed. Please go to “Manage Your Company Data” for any further information you may want on the configuration of your data flow.
- Please provide the State, Country, and any further contact information. When required, these particulars can be placed on your bills and invoices.
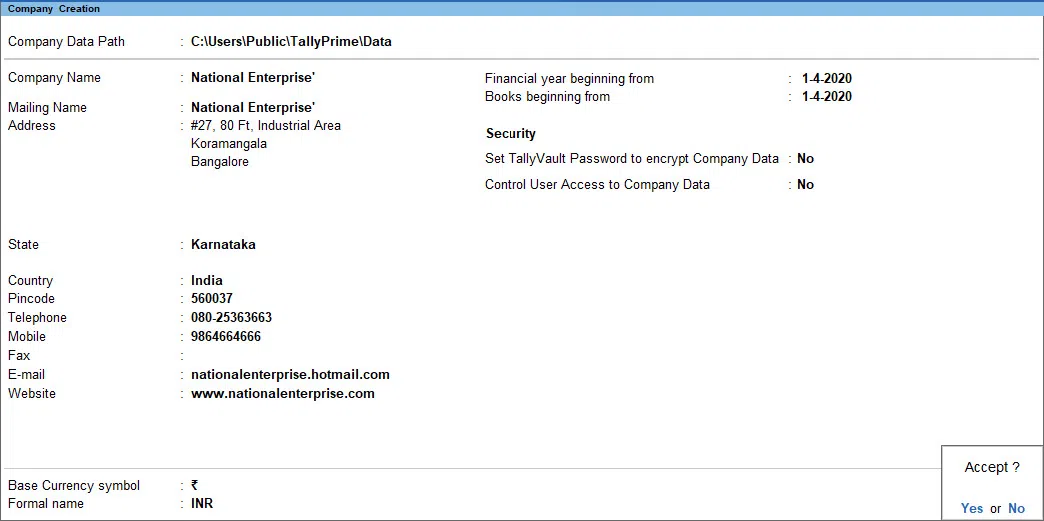
- Please proceed past this screen. You may permanently save the data and create the company by pressing the Ctrl and A keys at the same time. The remaining company data can be configured at any point in the future.
Note:
The names of the new union territories are published in Release 6.6.3. They are Dadra and Nagar Haveli, as well as Daman and Diu. All of the masters will have the name of the new Union Territories, including Daman and Diu, as well as Dadra and Nagar Haveli, added to them automatically. The name of the state or Union Territory before the merger is recorded in the box labelled “State (before reorganisation).” Keeping the name of the state or territory as it was before the merger makes it easier to manage transactions and tax filings from that time period.
- Configure the information for the upcoming fiscal year and the available security solutions that must be applied.
TallyPrime will automatically fill up some of this information depending on your computer’s date settings and the country you pick on the Company Creation page. The default value is “financial year commencing from.”
Therefore the books commencing from TallyPrime will initially populate this field with the date from which the Financial year will start by default. You are free to make any necessary changes to this.
Let’s say you launched your company on October 1, 2020, and have been meticulously recording all of your company’s transactions. You can begin updating the books commencing from October 1, 2020, although the beginning of the fiscal year will be April 1, 2020.
- Enable Edit Log: This is completely optional and has been made accessible starting with the TallyPrime Release 2.1. You have the option to turn on Edit Log for the Company by enabling it under the F12 menu option to Set Edit Log applicability. This will make it easier for you to access the Edit Log for the activities in masters and transactions that you will perform in the future.
In addition, operations performed at the company level, such as activating or disabling the Edit Log feature, performing data migration, or splitting data, which affect the Edit Log report of masters and transactions, will be noted in the Edit Log report under the company heading.
- Security: Setting security settings to secure your company’s data is recommended. However, if you’re unsure about about proceeding, it is recommended to get professional help. Further, you can also implement additional security measures for your business with features such as TallyVault and User controls.
If you do not see the Security option, hit the F12 (Configure) button: Make sure the security settings are set to “Yes” where applicable for greater security. Set TallyVault Password to encrypt company data and use User Access Control to restrict unauthorised access.
- Please provide the information on the base currency.
You can set the base currency to correspond with the monetary system used to keep track of transactions in your company.
To see all available choices regarding the base currency, hit the F12 (Configure)> Set button. Please provide further data regarding the base currency when you choose “Yes”.
Remember to refer to the multi-currency option if your firm’s operations include the exchange of more than one currency.
Please accept the prompt on the confirmation screen to create the company. You may always save your work by pressing Ctrl + A.
- After saving the business, you will be sent to the page that displays the firm’s features. It will display a prompt that says the company was successfully formed.
Also Read: Materials Consumption Summary in Tally
Setting Up the Features of the Company
When you create a company in TallyPrime, you have the option of configuring the essential features immediately or later, depending on your firm’s requirements. By default, the system will have activated and shown the bare minimum of elements necessary for you to begin tracking the transactions related to your business. To explore further features, navigate to the “Company Features” screen.
After you make the company, its name will be displayed in bold on the Gateway of Tally screen under “Name of Company.”
Multiple Businesses
Do you need to track and run more than one business? You can make as many companies as you want with TallyPrime, and each company can handle its own business transactions. You can also use the TallyPrime Group Company feature to get a consolidated view of multiple businesses or send summarised reports when required.
Also Read: Everything about Multi-Currency in Tally.ERP 9
Loading the Business Manually
Once you’ve created a company, you can load it in the following manner:
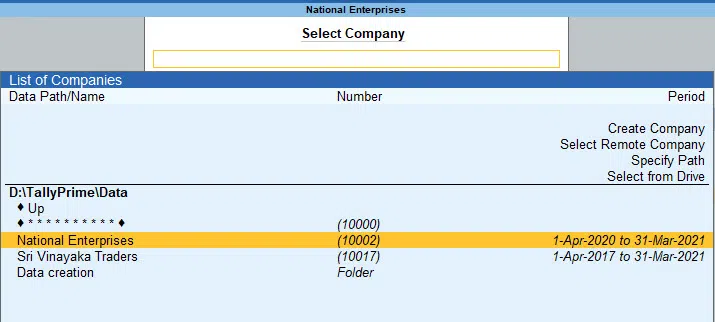
- Open TallyPrime, press Alt + F3 (Select Company), and choose the company from the list.
- If you have made more than one business, you can go to the data path and choose the one you want to open.
Loading the Business Automatically
You can set up TallyPrime to automatically load one or more companies every time you open it.
- Open the screen for Setting Up Startup: Press “Help” (F1), “Settings,” and “Startup.”
- Set “Load companies on startup” to “Yes” and press Enter on “Companies to load.”
- Choose one or more companies from the List of Companies to Load on the Startup screen, depending on your needs.
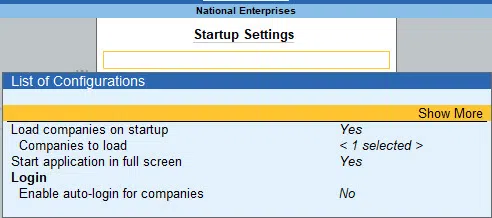
- After you’ve chosen the companies you want to load on startup, click End of List.
- When you open TallyPrime the next time, the companies you chose here will automatically be opened.
Also Read: How To Manage Mutual Fund Accounting In Tally Erp 9
Change Company Information
You can change your company’s address, phone number, or any other such information in TallyPrime if it was not given before or if it has changed. If you change these details, they will also appear in your printed reports and invoices. You can do this as mentioned below:
- Press Alt + K (Company) > Alt.
- Now make the changes that you need to make on the Company Change screen.

- Once you make the changes, you can save them by pressing Ctrl + A.
- You can also delete the company if you don’t need it anymore.
Allowing Back-dated Transactions
It is possible that you had kept track of your finances before the current financial year, but you had not entered them into Tally. Later, you wish to add all of the transactions from before the current year to your company in TallyPrime. Let’s consider this with an example. Say you started your business on May 1, 2019, and you’ve kept doing business since then. On June 1, 2019, you set up a company in TallyPrime. However, by default, the books and the financial year starting from April 1, 2020.
To be able to enter transactions in TallyPrime after May 1, 2019, you will need to change the information about the company’s financial year. You can do this by going through the following steps:
- Press Alt + K (Company) > Alt.
- Change the ‘Financial year beginning from’ date to April 1, 2019, and the ‘books beginning from’ date to date May 1, 2019, on the Company Change screen.

- Now you will be able to add past transactions into TallyPrime.
- Save the changes by pressing Ctrl + A.
- You can change the beginning date of the Books at any time in the Company Change screen to make entries for the financial year 2019-2020 that go back as far as April 1, 2019.
Also Read: How to Pass Salary Payable Voucher in Tally
Benefits of Creating a Company
- You may set up different levels of security for different users in your organisation based on their positions.
- TallyPrime allows you to establish an account for each user. You can see what tasks the user can execute based on their responsibilities.
- You may receive a consolidated view of business data for several firms by utilising the Group Company function. This feature is helpful as manually combining the accounts for each company and examining their financial statements can be time-consuming.
- Using TallyPrime, you can keep track of your business’s day-to-day transactions and record them even while you’re not in the office.
Conclusion:
You will be able to get things done fast and save valuable time with Tally’s assistance, allowing you to do more with fewer resources. While entering vouchers, TallyPrime lets you print or look at reports, and load another company without leaving the report. You can find out about details in multiple reports simultaneously and much more. You no longer have to remember shortcut keys because you have a consistent and easy-to-understand workflow that helps you get work done faster.
TallyPrime is so easy to use that you won’t have any trouble with it. With both straightforward and consistent navigation, you will only need to learn how to create a ledger, voucher, or go to a report once.